Love this? Save it for later!
Share the inspiration with your friends
The crackle of the fire was just background noise while I rummaged through our camping supplies, desperate to find something sweet to satisfy that unmistakable, late-night sugar craving. Honestly, I wasn’t expecting much beyond the usual s’mores routine, but then I spotted a stash of Reese’s cups tucked away in the cooler. That’s when the idea hit—why not stuff them inside waffle cones and roast them over the flames? Skeptical at first, I figured it was worth a shot for a quick treat that didn’t involve melting marshmallows on sticks for ages.
As those cones warmed and the chocolate started to ooze out, the aroma was almost hypnotic. The peanut butter and chocolate mingled with the smoky campfire scent, making everyone around the fire table lean in closer, eyes wide with anticipation. I kept thinking, “This might just be the easiest, most delicious campfire dessert I’ve ever made.” And honestly, it’s become a staple for every camping trip since—so simple, yet utterly addictive. Now, whenever I catch the faint smell of toasted cones or even just peanut butter and chocolate together, it takes me right back to that night.
There’s something quietly comforting about these Reese’s Campfire Cones—no fuss, no sticky hands, just pure, melty goodness wrapped in a crunchy shell. I guess that’s why this recipe stuck with me: it’s the kind of treat that feels like a little reward after a long day outdoors, a sweet pause that brings everyone together. If you’re looking for a fun, fuss-free way to impress your camping crew or just want a cozy dessert idea that’s easy to whip up on a whim, this is the one I trust to deliver every time.
Why You’ll Love This Reese’s Campfire Cones Recipe
Having tested this recipe over several trips and backyard fire pits, I can say it hits the sweet spot between convenience and indulgence. You don’t have to be a campfire chef to make it, and the results always impress—even the pickiest eaters come back for seconds. Here’s what makes this Reese’s Campfire Cones recipe stand out:
- Quick & Easy: Ready in under 10 minutes from start to finish, making it perfect for spontaneous cravings or winding down after a busy day.
- Simple Ingredients: Uses pantry staples and classic candy treats you probably already have, no special trips required.
- Perfect for Outdoor Fun: Whether it’s camping, backyard bonfires, or even a cozy fire pit evening, these cones bring everyone together.
- Crowd-Pleaser: Kids and adults alike rave about the gooey, melty peanut butter and chocolate combo inside the crisp waffle cone.
- Unbelievably Delicious: The crunch of the cone paired with warm, melted Reese’s is just next-level comfort food.
This isn’t just another s’mores alternative—it’s a creative, fuss-free way to enjoy classic flavors with a crunchy twist. The trick is in how the cones toast gently over the fire, warming the candy just right without burning the cone. It’s honestly the kind of recipe that makes you close your eyes and savor each bite. Plus, if you’re ever in the mood to switch things up, you can easily swap in different candies or add a sprinkle of mini marshmallows for extra gooeyness. For those evenings when you want cozy, sweet, and simple, these cones have become my go-to.
What Ingredients You Will Need
This recipe uses simple, wholesome ingredients to deliver bold flavor and satisfying texture without the fuss. Most are pantry staples or easily found at any grocery store, and you can tweak them to suit your dietary needs.
- Waffle Cones: Standard size, sturdy enough to hold fillings without falling apart. I prefer brands like Keebler or store-brand cones for their perfect crunch.
- Reese’s Peanut Butter Cups: Regular size, unwrapped. The classic combo of peanut butter and chocolate is key here.
- Mini Marshmallows: Optional, but they add a fun, gooey texture that pairs beautifully with the peanut butter cups.
- Chocolate Chips: Semi-sweet or milk chocolate, a handful to sprinkle inside the cone for extra melty chocolate goodness.
- Aluminum Foil: For wrapping the cones securely while roasting over the fire.
Substitution tips: If you want a gluten-free option, try gluten-free waffle cones—you can find these in many specialty stores. For a dairy-free version, swap Reese’s for peanut butter cups made with dairy-free chocolate, or use your favorite nut butter with dairy-free chocolate chunks. In summer, I sometimes toss in fresh berries before wrapping for a fruity touch, which reminds me of the fresh flavors in the Fresh Peaches and Cream recipe.
Equipment Needed
- Campfire or Outdoor Fire Pit: The classic way to roast these cones, providing that smoky flavor and warm, gentle heat.
- Aluminum Foil: Heavy-duty foil works best to wrap the cones tightly and prevent drips.
- Tongs: For safely handling the hot cones over the fire.
- Heatproof Gloves (Optional): Helpful if you’re new to campfire cooking or want extra protection from sparks.
- Timer or Watch: To keep track of roasting time so cones don’t burn.
If you don’t have a campfire, you can also roast these cones in a grill or even a conventional oven on low heat wrapped in foil. I’ve tried using an air fryer for a quicker indoor version, but the campfire flavor is really where this recipe shines. For budget-friendly options, basic kitchen tongs and standard aluminum foil do the trick just fine—no need for fancy gear.
Preparation Method

- Preheat your campfire or fire pit: Let the coals burn down until you have a nice bed of hot embers. This will provide steady, indirect heat perfect for melting the candy without burning the cones. (About 20-30 minutes)
- Prepare your cones: Carefully unwrap 3-4 Reese’s Peanut Butter Cups each cone. Place them inside the waffle cone along with a tablespoon (15g) of chocolate chips and a sprinkle of mini marshmallows, if using. You want the candy to be evenly distributed for melting.
- Wrap cones tightly: Wrap each filled cone completely in aluminum foil, folding edges securely so nothing leaks out while roasting. This also protects the cones from direct flames.
- Roast over the fire: Using tongs, place the foil-wrapped cones on the hot embers or hold them near the glowing coals—not directly in the flame. Roast for about 5-7 minutes, turning occasionally to warm evenly. You’ll know they’re ready when you feel warmth through the foil and the chocolate inside starts to melt.
- Carefully unwrap and enjoy: Let the cones cool for a minute or two before unwrapping to avoid burns. The inside should be gooey, melty, and irresistibly fragrant. The cone stays crisp, contrasting perfectly with the soft filling.
Tips: If you want to speed things up, preheat your cones near the fire before filling them. Watch closely to prevent scorching—cones burn quickly if held too close to open flames. If you’re roasting in an oven, place cones on a baking sheet at 350°F (175°C) for 7-10 minutes, wrapped in foil. Expect the smell of warm peanut butter and chocolate to fill your kitchen, similar to the cozy vibes you get making the Creamy Marshmallow Whip Cheesecake.
Cooking Tips & Techniques
Getting perfectly melty Reese’s Campfire Cones is all about gentle heat and timing. Here’s what I’ve learned after a handful of smoky attempts:
- Don’t rush the fire: Roasting over hot embers rather than open flames helps melt the candy slowly without burning the cones. If the flames are too high, the cones crisp too fast and burn before the filling softens.
- Wrap tightly: Aluminum foil acts like a mini oven, trapping heat and preventing chocolate from dripping into the fire. Fold edges well so everything stays contained.
- Use tongs for safety: Hot cones can be tricky to handle. Tongs give you control and keep your fingers safe from sparks or heat.
- Test one cone first: If you’re unsure about timing, roast one cone first and adjust based on how melted you want the filling.
- Don’t overfill: Too much candy or marshmallow can cause leaks or soggy cones. Keep fillings moderate for best texture.
I once left a cone too close to the flame, and it caught fire—yikes! That taught me to always watch closely and turn cones frequently. Also, prepping cones before the fire helps speed things up but don’t fill them too early or the cones might get soggy. Multitasking by prepping toppings while the fire heats saves time and keeps everything flowing smoothly—just like when I’m juggling recipes for a full meal like the Savory Cauliflower and Ground Beef Hash.
Variations & Adaptations
One of the best things about this Reese’s Campfire Cones recipe is how easy it is to customize. Here are a few variations I’ve tried and loved:
- Nut-Free Version: Replace Reese’s with sunflower seed butter cups or just use chocolate chips and mini marshmallows for a safe alternative.
- Fruit Twist: Add sliced strawberries or banana pieces inside the cone along with the chocolate for a fresh, fruity contrast. In warmer months, fresh berries like in the Creamy Strawberry Crumble Chia Pudding complement the chocolate beautifully.
- Spicy Kick: Toss in a pinch of cinnamon or cayenne powder with the chocolate chips for a subtle warmth that surprises the palate.
- Different Candies: Swap Reese’s for peanut butter M&M’s, caramel squares, or even chopped peanut butter cups for texture variation.
- Indoor Oven Method: Wrap cones in foil and bake at 350°F (175°C) for 7-10 minutes for a quick indoor treat.
I once added a sprinkle of crushed pretzels for a salty crunch that balanced the sweetness perfectly. It might sound odd, but trust me on this one—it’s delicious and adds a nice texture contrast. These cones are truly a flexible dessert that adapts well to any taste or occasion.
Serving & Storage Suggestions
Serve these Reese’s Campfire Cones warm for the ultimate gooey, melty experience. They’re best enjoyed right out of the foil while the chocolate and peanut butter are still soft and warm. If you’re serving a crowd around a fire, hand out the cones wrapped in parchment paper or napkins to avoid sticky fingers.
For pairing, a cold glass of milk or a cup of hot cocoa complements these cones beautifully—think classic campfire vibes. If you want to add a fresh note, serve alongside seasonal fruit like sliced peaches (similar to the Fresh Peaches and Cream dessert) or a simple berry salad for balance.
Leftovers can be wrapped tightly and refrigerated for up to 2 days, but reheating is tricky. To warm them again, unwrap and place in a preheated oven at 300°F (150°C) for 5 minutes wrapped loosely in foil. Avoid microwaving as it can make the cones soggy. Flavors actually deepen a bit after resting overnight but the texture is best fresh.
Nutritional Information & Benefits
This campfire treat is definitely on the indulgent side but offers some benefits from its ingredients. Reese’s peanut butter cups contain protein and healthy fats from peanuts, which provide sustained energy—perfect for outdoor adventures. The waffle cones add a satisfying crunch and familiar comforting carbs.
Estimated per cone: approximately 250-300 calories, 12g fat, 30g carbohydrates, and 5g protein, depending on candy and cone size. For those mindful of allergens, note the presence of peanuts, dairy, and gluten in standard ingredients.
If you want a lighter version, consider using mini cones with reduced candy or swapping in nuts and fruit for extra fiber and nutrients. I appreciate this recipe as a special treat that balances convenience and flavor without complicated prep, making it a practical choice for busy, fun-filled days.
Conclusion
This Reese’s Campfire Cones recipe is a no-fuss, irresistible dessert that has become a favorite for good reason. It’s easy enough for any skill level, quick to assemble, and delivers that perfect combo of crunchy and melty every time. What makes me keep coming back to it is how effortlessly it sparks joy around the fire—no sticky fingers, no complicated steps, just pure, comforting sweetness.
Feel free to tweak the fillings or add your own twist based on what you love—this recipe is flexible and welcoming of creativity. I hope it brings a little extra warmth and sweetness to your next outdoor gathering or cozy night in.
If you try it, I’d love to hear how you made it your own! Drop a comment below sharing your favorite variations or moments enjoying these cones. Here’s to many more campfire memories with a little melted Reese’s magic.
Frequently Asked Questions About Reese’s Campfire Cones
Can I make Reese’s Campfire Cones without a campfire?
Absolutely! You can roast the cones in a preheated oven at 350°F (175°C) for about 7-10 minutes wrapped in foil. A grill or even an air fryer on low heat also works well to melt the candy gently.
What’s the best way to prevent the cones from burning?
Use indirect heat by placing cones on hot embers or coals instead of direct flames. Wrapping tightly in aluminum foil also protects cones from charring.
Can I use other candies besides Reese’s Peanut Butter Cups?
Yes! Try caramel squares, chocolate chips, or any peanut butter-based candy you like. Just avoid overly sticky or liquid fillings that might leak during roasting.
Are there gluten-free options for this recipe?
Definitely. Use gluten-free waffle cones and check candy labels for gluten-free certification to enjoy a safe version of this treat.
How do I store leftover campfire cones?
Wrap them tightly and refrigerate for up to 2 days. Reheat in the oven at 300°F (150°C) for 5 minutes wrapped loosely in foil to warm without sogginess.
Pin This Recipe!
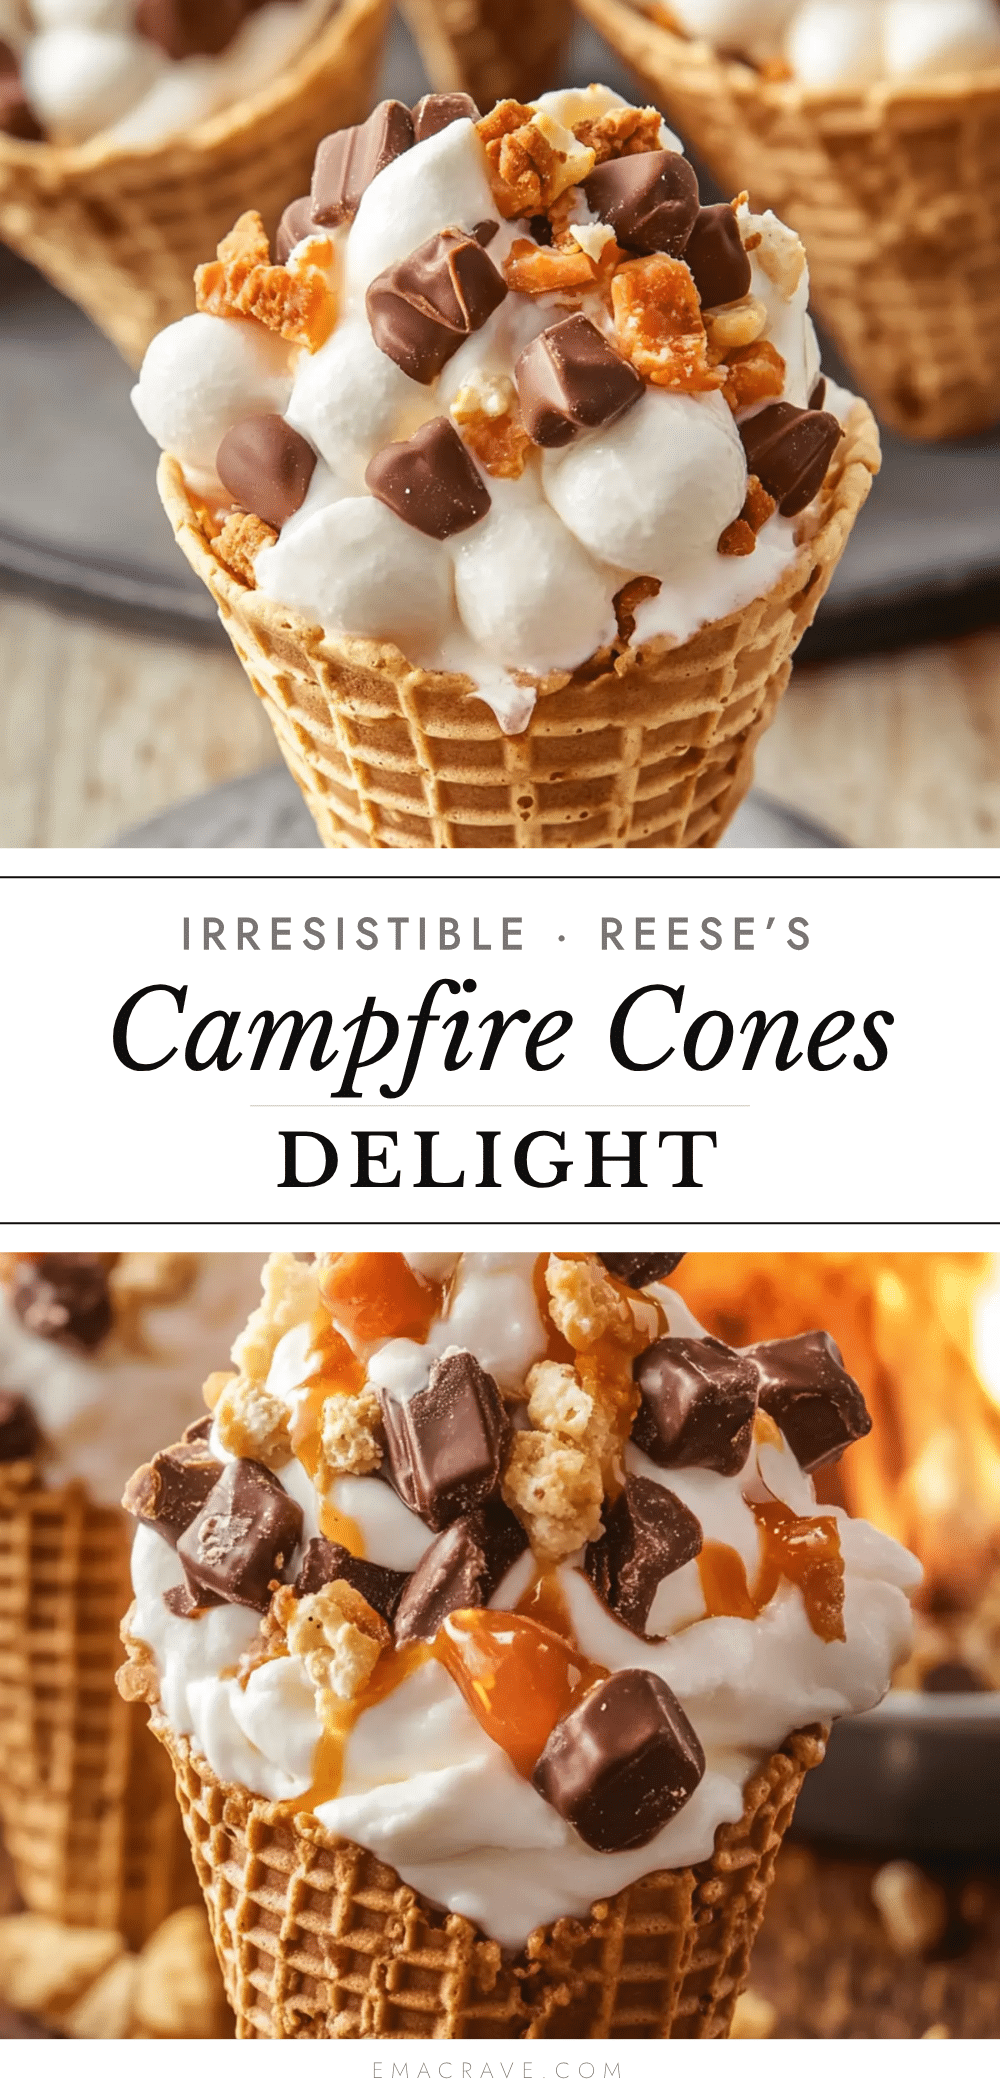
Reese’s Campfire Cones

A quick and easy campfire dessert featuring Reese’s Peanut Butter Cups stuffed inside waffle cones and roasted over a fire for a melty, crunchy treat.
- Prep Time: 5 minutes
- Cook Time: 7 minutes
- Total Time: 12 minutes
- Yield: 4 servings
- Category: Dessert
- Cuisine: American
Ingredients
- Waffle cones (standard size, sturdy)
- Reese’s Peanut Butter Cups (3-4 per cone, unwrapped)
- Chocolate chips (1 tablespoon per cone, semi-sweet or milk chocolate)
- Mini marshmallows (optional, a sprinkle per cone)
- Aluminum foil (for wrapping cones)
Instructions
- Preheat your campfire or fire pit until you have a nice bed of hot embers (about 20-30 minutes).
- Carefully unwrap 3-4 Reese’s Peanut Butter Cups per cone. Place them inside the waffle cone along with 1 tablespoon (15g) of chocolate chips and a sprinkle of mini marshmallows if using.
- Wrap each filled cone tightly in aluminum foil, folding edges securely to prevent leaks and protect cones from direct flames.
- Using tongs, place the foil-wrapped cones on hot embers or near glowing coals (not directly in flames). Roast for 5-7 minutes, turning occasionally to warm evenly until chocolate melts and cones feel warm through the foil.
- Carefully unwrap cones after letting them cool for 1-2 minutes to avoid burns. Serve warm and enjoy the gooey, melty filling with a crisp cone.
Notes
Use indirect heat by roasting over hot embers instead of direct flames to prevent burning. Wrap cones tightly in foil to avoid drips. For indoor cooking, bake wrapped cones at 350°F (175°C) for 7-10 minutes. Leftovers can be refrigerated up to 2 days and reheated in the oven at 300°F (150°C) for 5 minutes wrapped loosely in foil. Avoid microwaving to prevent soggy cones. Variations include nut-free versions, adding fruit, spices, or different candies.
Nutrition
- Serving Size: 1 cone
- Calories: 275
- Sugar: 20
- Sodium: 150
- Fat: 12
- Saturated Fat: 4
- Carbohydrates: 30
- Fiber: 1
- Protein: 5
Keywords: Reese’s, campfire cones, camping dessert, peanut butter cups, easy dessert, outdoor treat, s’mores alternative