Love this? Save it for later!
Share the inspiration with your friends
The first time I made these s’mores scones, I was honestly just trying to use up leftover marshmallows from a camping trip that got rained out. You know how it goes—you buy all the stuff for a perfect weekend by the fire, and then the weather decides to be difficult. So there I was, standing in my kitchen on a gloomy Tuesday morning, staring at a half-empty bag of mini marshmallows and a bar of chocolate that had seen better days.
I had been testing scone recipes for weeks, trying to perfect that flaky, buttery texture that makes a good scone worth waking up for. My banana bread scones had turned out amazing, but I wanted something different—something that felt like a treat rather than breakfast. The marshmallows were practically begging to be used, and honestly, who says scones have to be fancy? I started chopping chocolate, tore open the marshmallow bag, and just went for it.
The kitchen smelled incredible—like butter and sugar and that slightly toasty scent marshmallows get when they’re close to heat. My husband wandered in, coffee in hand, and asked if I was making dessert for breakfast. I told him it was “research.” The scones came out golden on the outside, soft and tender inside, with pockets of melted chocolate and gooey marshmallow that stretched with every bite. We stood at the counter eating them warm, and I knew I had stumbled onto something special.
These best s’mores scones capture everything you love about the classic campfire treat but in a form that works any time of year. No campfire required, no sticky fingers from roasting marshmallows on a stick—just pure, buttery, chocolatey goodness that comes together in under an hour.
Why You’ll Love This Recipe
Let me tell you why these s’mores scones have become my most-requested recipe from friends and family. I’ve tested this recipe at least six times to get the proportions just right, and every batch disappeared faster than I expected.
- Quick & Easy: From start to finish, you’re looking at about 40 minutes. Mix, shape, bake, and you’re done. No yeast, no rising time, no complicated techniques.
- Simple Ingredients: You probably have most of these in your kitchen right now. Butter, flour, sugar, cream—the usual suspects. The marshmallows and chocolate are the only “special” items, and you can find those anywhere.
- Perfect for Any Occasion: These work for weekend brunch, afternoon tea, dessert, or just because it’s Tuesday. They’re fancy enough to impress guests but easy enough for a random baking craving.
- Crowd-Pleaser: Kids go crazy for them. Adults pretend to be sophisticated but secretly eat two. I brought a batch to a potluck and got asked for the recipe four times.
- Unbelievably Delicious: The combination of buttery scone, melted chocolate, and caramelized marshmallow is next-level comfort food. It’s like a campfire memory in baked form.
What makes these different from other scone recipes is the technique. I use cold butter grated into the flour (learned that trick from a pastry chef friend), which creates those flaky layers without overworking the dough. And I fold the marshmallows in at the very end so they stay intact during mixing, creating little pockets of gooeyness throughout.
This isn’t just another scone recipe. It’s the kind that makes you close your eyes after the first bite. It’s comfort food reimagined—familiar flavors but in a form that feels fresh and exciting. Perfect for impressing guests without stress, or turning a simple morning into something memorable.
What Ingredients You Will Need
This recipe uses simple, wholesome ingredients to deliver bold flavor and satisfying texture without the fuss. Most of these are pantry staples, which makes these s’mores scones perfect for spontaneous baking sessions.
For the Scones
- 2 cups all-purpose flour (250g) – I use unbleached all-purpose for the best texture. King Arthur Flour is my go-to brand for consistent results.
- 1/3 cup granulated sugar (65g) – Adds just enough sweetness without making the scones taste like cookies. You can reduce this slightly if you prefer less sweet.
- 1 tablespoon baking powder – Make sure it’s fresh! Expired baking powder is the number one reason scones don’t rise properly. Test it by dropping a bit in hot water—if it fizzes, it’s good.
- 1/2 teaspoon salt – Fine sea salt works best. Don’t skip this—salt balances the sweetness and enhances the chocolate flavor.
- 1/2 cup cold unsalted butter (113g) – This is crucial. The butter must be cold, straight from the fridge. I actually pop mine in the freezer for 10 minutes before grating. If you only have salted butter, reduce the added salt to 1/4 teaspoon.
- 1/2 cup heavy cream (120ml) – Plus extra for brushing on top. Heavy cream gives scones their tender, rich texture. You can substitute half-and-half in a pinch, but the scones won’t be quite as flaky.
- 1 large egg – Room temperature is ideal, but cold works fine since everything else is cold anyway.
- 1 teaspoon vanilla extract – Pure vanilla extract makes a difference. Imitation works, but the flavor won’t be as rich.
For the S’mores Mix-Ins
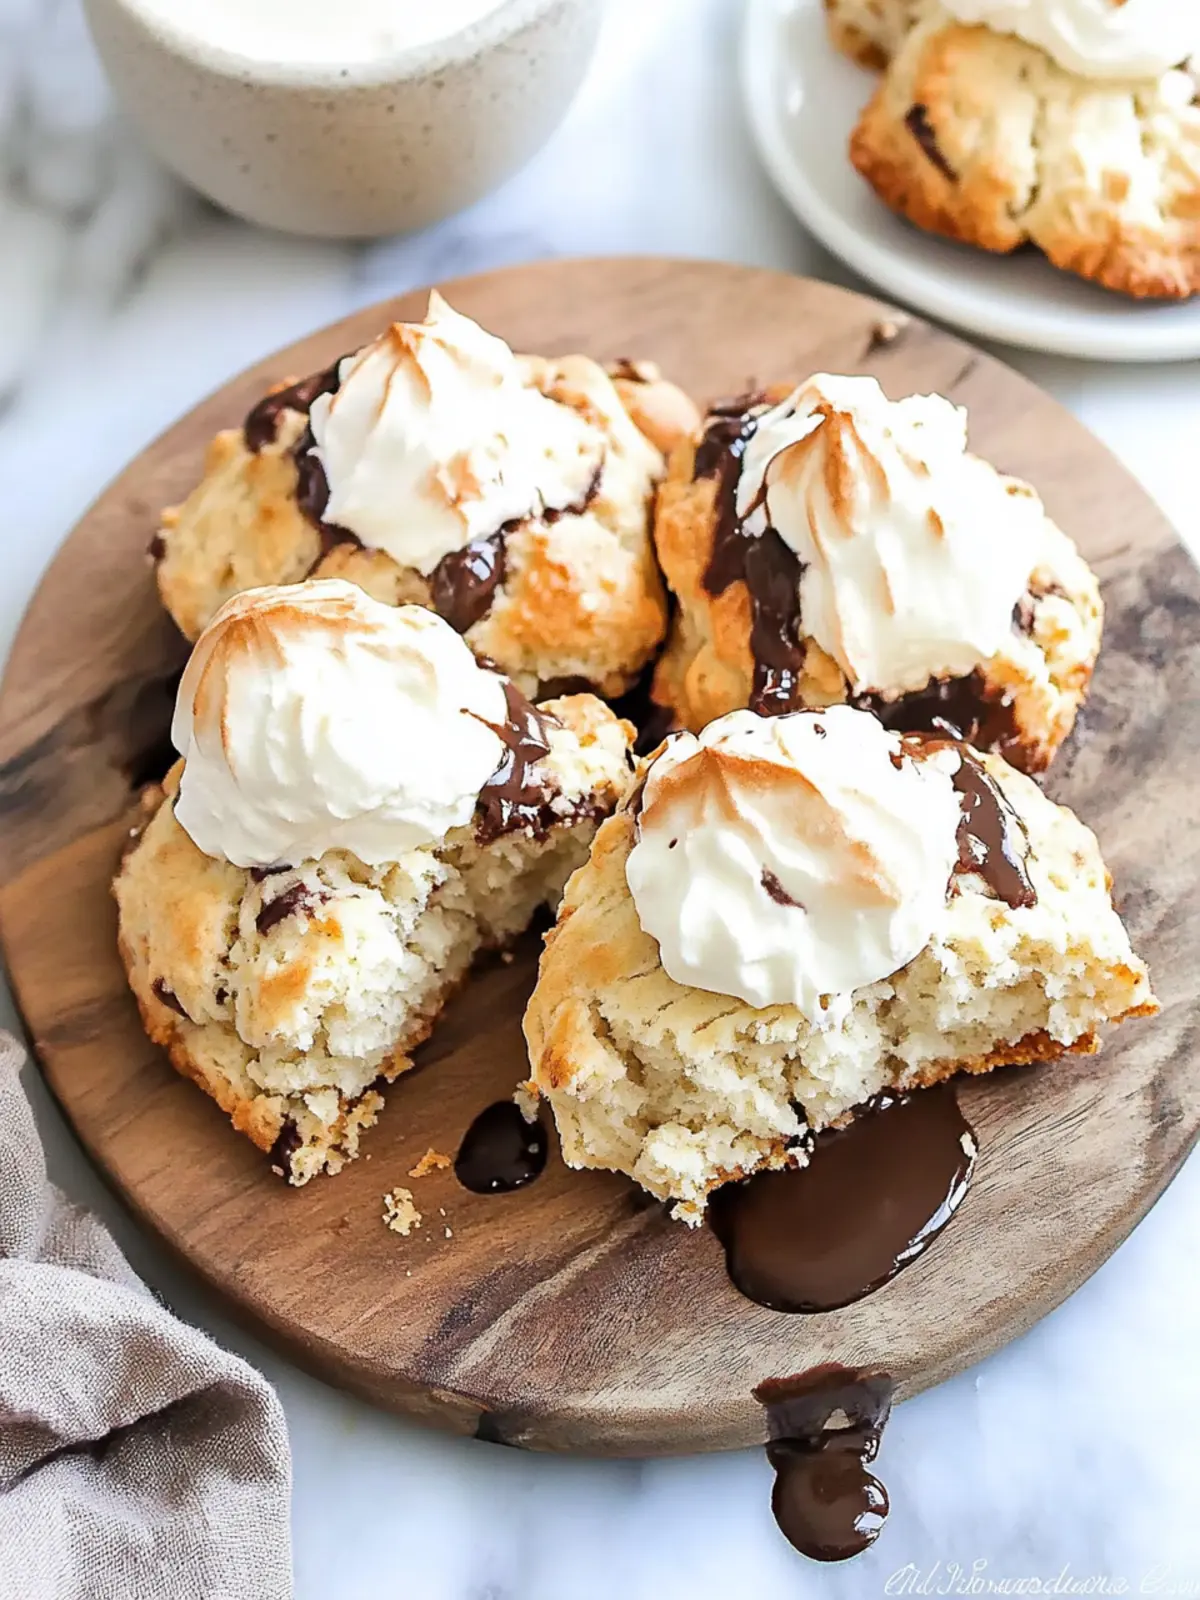
- 3/4 cup semi-sweet chocolate chips (130g) – I prefer Ghirardelli or Guittard for the best melt. You can also chop up a chocolate bar for bigger chunks. Dark chocolate works beautifully too.
- 3/4 cup mini marshmallows (about 85g) – Regular marshmallows cut into quarters work too, but mini marshmallows distribute more evenly. Pro tip: freeze the marshmallows for 15 minutes before adding them to the dough—they hold their shape better during mixing.
- 1/2 cup crushed graham crackers (about 4 full sheets) – This is my secret ingredient. I pulse them in the food processor until they’re coarse crumbs, then mix them into the flour. It adds that unmistakable s’mores flavor throughout the scone, not just on top.
For the Topping
- 1 tablespoon heavy cream – For brushing the tops before baking. This gives them that beautiful golden-brown finish.
- 1 tablespoon coarse sugar – Demerara or turbinado sugar adds a lovely crunch. Regular granulated sugar works too, but the texture won’t be as nice.
- Extra mini marshmallows and chocolate chips – For pressing into the tops right before baking. This makes them look as good as they taste.
If you’re out of heavy cream, you can substitute whole milk mixed with 2 tablespoons of melted butter. The texture will be slightly less rich, but still delicious. For a dairy-free version, use cold vegan butter and full-fat coconut cream—I tested this for a friend and it worked surprisingly well.
Equipment Needed
You don’t need anything fancy to make these best s’mores scones. Here’s what I use:
- Large mixing bowl – Any bowl works, but I prefer a wide one for easy mixing.
- Box grater or food processor – Grating cold butter is the key to flaky scones. A box grater works great and is easier to clean. If you have a food processor, you can pulse the butter into the flour instead.
- Pastry cutter or two forks – For cutting the butter into the flour if you’re not grating it. I honestly prefer grating—it’s faster and more consistent.
- Baking sheet – Line it with parchment paper for easy cleanup. I use a half-sheet pan.
- 2-inch round biscuit cutter – For cutting out the scones. A knife works too if you want square scones (and no waste from re-rolling scraps).
- Pastry brush – For brushing cream on top. A silicone brush is easiest to clean.
- Cooling rack – Helps the scones cool evenly and prevents soggy bottoms.
If you don’t have a biscuit cutter, just use a knife to cut the dough into triangles or squares. Honestly, I sometimes prefer square scones because there’s no re-rolling scraps. And if you’re using a food processor, be careful not to over-process—you want pea-sized butter pieces, not butter paste.
Preparation Method
Let me walk you through this step by step. I’ve made these s’mores scones more times than I can count, so I know exactly where things can go wrong and how to avoid it.
- Preheat your oven to 400°F (200°C). Line a baking sheet with parchment paper. Getting the oven hot is important—scones need that initial blast of heat to rise properly.
- Crush the graham crackers. Place 4 full sheets in a zip-top bag and crush them with a rolling pin, or pulse them in a food processor until you have coarse crumbs. You want some texture, not powder. Set aside.
- Grate the cold butter. Take your stick of butter straight from the fridge (or freezer if you chilled it) and grate it using the large holes of a box grater. Work quickly so the butter stays cold. The grated pieces should look like little yellow shreds. Pop them back in the fridge while you mix the dry ingredients.
- Mix the dry ingredients. In a large bowl, whisk together the flour, sugar, baking powder, salt, and crushed graham crackers. Make sure everything is evenly distributed—nobody wants a pocket of baking powder in their scone.
- Add the grated butter. Take the butter out of the fridge and add it to the flour mixture. Use your fingers or a pastry cutter to toss the butter with the flour until each piece is coated. The mixture should look like coarse meal with some pea-sized butter pieces still visible. This is what creates those flaky layers.
- Mix the wet ingredients. In a small bowl or measuring cup, whisk together the heavy cream, egg, and vanilla extract until smooth. Don’t skip the whisking—you want the egg fully incorporated into the cream.
- Combine wet and dry. Make a well in the center of the flour mixture and pour in the cream mixture. Use a fork or your hands to stir gently until the dough just comes together. It will look shaggy and uneven—that’s exactly what you want. Overmixing leads to tough scones.
- Fold in the mix-ins. Add the chocolate chips and frozen mini marshmallows. Fold them in gently with your hands or a spatula. The dough will be sticky, and some marshmallows might try to escape. Just press them back in. Work quickly so the marshmallows don’t start melting from the warmth of your hands.
- Shape the dough. Turn the dough out onto a lightly floured surface. Gently pat it into a circle about 3/4-inch thick. Don’t use a rolling pin—the pressure will overwork the dough. Use your hands and be gentle. The circle should be about 8 inches across.
- Cut the scones. Use a 2-inch biscuit cutter to cut out rounds, pressing straight down without twisting. Twisting seals the edges and prevents the scones from rising properly. If you’re making square scones, cut the circle into 8 wedges with a sharp knife.
- Place on baking sheet. Arrange the scones on the prepared baking sheet about 2 inches apart. They’ll spread a little during baking. Gather any scraps, gently press them together, and cut out more scones until all the dough is used.
- Add toppings. Brush the tops with the remaining tablespoon of heavy cream. Sprinkle with coarse sugar. Press a few extra chocolate chips and mini marshmallows into the tops of each scone—this makes them look gorgeous and ensures every bite has a little something special.
- Bake. Place the baking sheet in the preheated oven and bake for 14-16 minutes, or until the scones are golden brown on top and the marshmallows are puffed and lightly toasted. The chocolate should be melted and bubbly around the edges.
- Cool. Let the scones cool on the baking sheet for 5 minutes, then transfer them to a cooling rack. The marshmallows will be very hot and stretchy right out of the oven, so give them a few minutes to set up.
Your kitchen is going to smell incredible at this point. I usually can’t resist eating one while it’s still warm—the chocolate is melty, the marshmallow is gooey, and the scone itself is tender and buttery. It’s pure magic.
Cooking Tips & Techniques
After making these s’mores scones at least a dozen times, I’ve learned a few things the hard way. Let me save you some trouble.
Keep everything cold. This is the most important rule of scone-making. Cold butter creates steam pockets in the oven, which gives you those flaky layers. If your kitchen is warm, chill your mixing bowl and even your flour for 10 minutes before starting. I’ve made the mistake of letting the dough sit out while I answered the phone, and the scones came out flat and dense.
Freeze the marshmallows. I learned this after my first batch turned into a giant marshmallow blob. Mini marshmallows start melting as soon as they hit the warm dough. If you freeze them for 15-20 minutes beforehand, they hold their shape during mixing and create distinct pockets of gooeyness in the baked scones.
Don’t overmix the dough. This is where most people go wrong. Mix until the dough just comes together—it should look shaggy and a little messy. Overmixing develops the gluten and makes scones tough and rubbery. I speak from experience: I once overmixed a batch while distracted by a podcast, and the result was edible but definitely not my best work.
Use a bench scraper. If you have one, it’s perfect for lifting and turning the sticky dough without adding too much flour. Too much extra flour makes scones dry. If you don’t have a bench scraper, use a metal spatula.
Bake from chilled. After cutting the scones, pop them in the freezer for 10 minutes before baking. This firms up the butter and marshmallows, leading to taller, flakier scones. I do this every time now—it makes a noticeable difference.
Watch the bottoms. The marshmallows can drip off the scones and caramelize on the parchment paper. If they start to burn, the smoke can be unpleasant. Keep an eye on the oven during the last few minutes of baking. If the bottoms are getting too dark, slide another baking sheet underneath to insulate them.
Variations & Adaptations
One of the best things about this recipe is how flexible it is. Here are some variations I’ve tried and loved:
Dark Chocolate & Sea Salt: Swap the semi-sweet chocolate chips for dark chocolate chunks (70% cocoa or higher). After baking, sprinkle the warm scones with flaky sea salt. The combination of salty, sweet, and bitter is incredible. This is my husband’s favorite version.
Peanut Butter S’mores: Add 1/4 cup of creamy peanut butter to the wet ingredients before mixing. Swirl it in gently so you get ribbons of peanut butter throughout the dough. Top with chopped peanuts for extra crunch. Fair warning: these disappear fast.
Gluten-Free Version: Substitute the all-purpose flour with a 1:1 gluten-free baking flour blend (I like Bob’s Red Mill). Add 1/2 teaspoon of xanthan gum if your blend doesn’t already include it. The texture will be slightly more tender and crumbly, but the flavor is still spot-on.
Vegan S’mores Scones: Use cold vegan butter (I recommend Miyoko’s or Country Crock Plant Butter), full-fat coconut cream instead of heavy cream, and a flax egg (1 tablespoon ground flaxseed mixed with 3 tablespoons water, let sit for 5 minutes). Make sure your chocolate chips and marshmallows are vegan-friendly—Dandies makes great vegan marshmallows.
White Chocolate & Raspberry: Replace the semi-sweet chocolate with white chocolate chips, and fold in 1/2 cup of fresh or frozen raspberries along with the marshmallows. The tart raspberries cut through the sweetness beautifully. This version reminds me of a fancy bakery scone.
For a fun twist, try making these as scone wedges instead of rounds. Pat the dough into a circle, cut it into 8 triangles like a pizza, and bake them that way. It’s faster and there’s no waste from re-rolling scraps. Plus, the wedges look rustic and homemade.
Serving & Storage Suggestions
These s’mores scones are best served warm, when the chocolate is still melted and the marshmallows are stretchy. I like to pop them in a 300°F oven for 5 minutes if they’ve cooled down—it brings back that fresh-from-the-oven magic.
How to serve: Arrange the scones on a pretty plate or wooden board. They’re wonderful on their own, but if you want to go all out, serve them with a side of warm chocolate sauce for dipping. A dollop of whipped cream or a scoop of vanilla ice cream turns them into a full dessert. For brunch, I pair them with fluffy miso scrambled eggs for a sweet-savory balance that’s absolutely perfect.
What to drink: These scones love coffee. A strong latte or a simple black coffee cuts through the sweetness. For tea drinkers, chai or English breakfast tea works beautifully. If you’re feeling indulgent, a cold glass of milk is always a good choice.
Storage: Store leftover scones in an airtight container at room temperature for up to 2 days. After that, they start to dry out. Don’t refrigerate them—the fridge draws out moisture and makes scones stale faster.
Freezing: These freeze beautifully. Cool the scones completely, then wrap them individually in plastic wrap and place them in a freezer bag. They’ll keep for up to 3 months. To reheat, unwrap and pop them in a 350°F oven for 8-10 minutes, or microwave for 20-30 seconds. The microwave is faster, but the oven gives you back that crispy exterior.
Make-ahead tip: You can prepare the scone dough, cut the scones, and freeze them unbaked on a baking sheet. Once frozen solid, transfer them to a freezer bag. When you’re ready to bake, place the frozen scones on a baking sheet, brush with cream, and bake at 400°F for 16-18 minutes. No need to thaw first. This is my favorite trick for fresh scones any morning.
The flavors actually develop overnight. If you can resist eating them all on day one, day two scones have a deeper, more caramelized flavor from the marshmallows and graham crackers settling in. Not that they usually last that long in my house.
Nutritional Information & Benefits
Let’s be real—these are a treat, not a health food. But here’s what you’re looking at per scone (based on 8 scones):
| Nutrient | Amount Per Scone |
|---|---|
| Calories | 385 |
| Total Fat | 22g |
| Saturated Fat | 13g |
| Cholesterol | 72mg |
| Sodium | 310mg |
| Total Carbohydrates | 44g |
| Dietary Fiber | 2g |
| Sugars | 22g |
| Protein | 5g |
Now, let’s talk about the silver linings. Dark chocolate (if you use it) contains antioxidants called flavonoids that support heart health. The butter provides vitamin A for healthy vision and immune function. And hey, there’s an egg in there—protein! I’m not saying these are good for you, but they’re made with real ingredients, which is more than you can say for a lot of packaged snacks.
These scones contain gluten, dairy, and eggs, so they’re not suitable for those with allergies to those ingredients. Check the variations section above for vegan and gluten-free adaptations.
My personal philosophy? Food is about joy and connection. These s’mores scones bring people together, make mornings special, and turn ordinary days into little celebrations. That has its own kind of nutritional value.
Conclusion
These best s’mores scones have become a staple in my kitchen for good reason. They take everything you love about the classic campfire treat—the chocolate, the marshmallow, that unmistakable graham cracker flavor—and wrap it up in a tender, buttery scone that’s somehow even more satisfying. No campfire required, no sticky fingers, no weather-dependent plans.
What I love most about this recipe is how forgiving it is. The first time I made them, I forgot to freeze the marshmallows and ended up with marshmallow goo everywhere. They still tasted amazing. The second time, I overbaked them slightly, and they were still devoured within hours. This recipe wants you to succeed.
I’d love to hear how yours turn out. Did you try one of the variations? Did you come up with your own twist? Drop a comment below and let me know. And if you’re looking for more cozy baking inspiration, my fluffy blueberry ricotta scones with lemon glaze are another reader favorite that’s perfect for spring mornings.
Go ahead—preheat that oven, grate that cold butter, and make some magic happen. Your kitchen is about to smell like the best camping trip you never took. Happy baking, friend!
Frequently Asked Questions
Can I use regular marshmallows instead of mini marshmallows?
Absolutely. Just cut them into quarters with kitchen scissors or a sharp knife. I actually recommend freezing them for 20 minutes first—they’re much easier to cut when frozen, and they won’t stick to your knife as much.
Why did my scones turn out flat and dense?
This usually happens for one of three reasons: your butter was too warm, you overmixed the dough, or your baking powder was expired. Make sure your butter is straight from the fridge (or even freezer), mix just until the dough comes together, and check that your baking powder is fresh by testing it in hot water.
Can I make these scones ahead of time for a party?
Yes! You have two options. You can bake them a day ahead and reheat in a 300°F oven for 5 minutes before serving. Or you can prepare the dough, cut the scones, and freeze them unbaked. Bake straight from frozen, adding 2-3 extra minutes to the baking time.
How do I keep the marshmallows from burning?
The marshmallows on top can get dark quickly because they’re exposed to direct heat. Keep an eye on the oven during the last 3-4 minutes of baking. If the tops are getting too brown, tent a piece of aluminum foil loosely over the baking sheet. The marshmallows inside the scones will be perfectly fine since they’re protected by the dough.
Can I double this recipe?
Definitely. The recipe doubles beautifully. Just make sure you have enough space on your baking sheets—don’t overcrowd them, or the scones won’t bake evenly. You might need to bake in two batches or use two oven racks, rotating the sheets halfway through. The baking time stays about the same.
Pin This Recipe!

Best Smores Scones: Easy Gooey Chocolate Recipe
These s’mores scones capture everything you love about the classic campfire treat but in a form that works any time of year. No campfire required, just pure, buttery, chocolatey goodness that comes together in under an hour.
- Prep Time: 20 minutes
- Cook Time: 16 minutes
- Total Time: 36 minutes
- Yield: 8 servings 1x
- Category: Dessert
- Cuisine: American
Ingredients
- 2 cups all-purpose flour (250g)
- 1/3 cup granulated sugar (65g)
- 1 tablespoon baking powder
- 1/2 teaspoon fine sea salt
- 1/2 cup cold unsalted butter (113g)
- 1/2 cup heavy cream (120ml), plus extra for brushing
- 1 large egg
- 1 teaspoon vanilla extract
- 3/4 cup semi-sweet chocolate chips (130g)
- 3/4 cup mini marshmallows (about 85g)
- 1/2 cup crushed graham crackers (about 4 full sheets)
- 1 tablespoon coarse sugar (Demerara or turbinado)
- Extra mini marshmallows and chocolate chips for topping
Instructions
- Preheat your oven to 400°F (200°C). Line a baking sheet with parchment paper.
- Crush the graham crackers: Place 4 full sheets in a zip-top bag and crush with a rolling pin, or pulse in a food processor until coarse crumbs form. Set aside.
- Grate the cold butter: Grate the stick of butter using the large holes of a box grater. Work quickly and keep the grated butter cold.
- Mix the dry ingredients: In a large bowl, whisk together the flour, sugar, baking powder, salt, and crushed graham crackers.
- Add the grated butter: Add the grated butter to the flour mixture. Use your fingers or a pastry cutter to toss until the mixture looks like coarse meal with some pea-sized butter pieces.
- Mix the wet ingredients: In a small bowl, whisk together the heavy cream, egg, and vanilla extract until smooth.
- Combine wet and dry: Make a well in the center of the flour mixture and pour in the cream mixture. Stir gently with a fork until the dough just comes together. It should look shaggy.
- Fold in the mix-ins: Add the chocolate chips and frozen mini marshmallows. Fold gently until evenly distributed.
- Shape the dough: Turn the dough out onto a lightly floured surface. Gently pat into a circle about 3/4-inch thick and 8 inches across.
- Cut the scones: Use a 2-inch biscuit cutter to cut out rounds, pressing straight down without twisting. Alternatively, cut the circle into 8 wedges with a sharp knife.
- Place on baking sheet: Arrange scones about 2 inches apart. Gather scraps, gently press together, and cut more scones.
- Add toppings: Brush tops with remaining heavy cream. Sprinkle with coarse sugar. Press extra chocolate chips and mini marshmallows into the tops.
- Bake: Bake for 14-16 minutes, until golden brown and marshmallows are puffed and lightly toasted.
- Cool: Let cool on the baking sheet for 5 minutes, then transfer to a cooling rack.
Notes
Keep all ingredients cold for flaky scones. Freeze marshmallows for 15-20 minutes before adding to dough. Do not overmix. For best results, chill cut scones for 10 minutes before baking.
Nutrition
- Serving Size: 1 scone
- Calories: 385
- Sugar: 22
- Sodium: 310
- Fat: 22
- Saturated Fat: 13
- Carbohydrates: 44
- Fiber: 2
- Protein: 5
Keywords: s'mores scones, chocolate scones, marshmallow scones, easy scone recipe, campfire scones



