Love this? Save it for later!
Share the inspiration with your friends
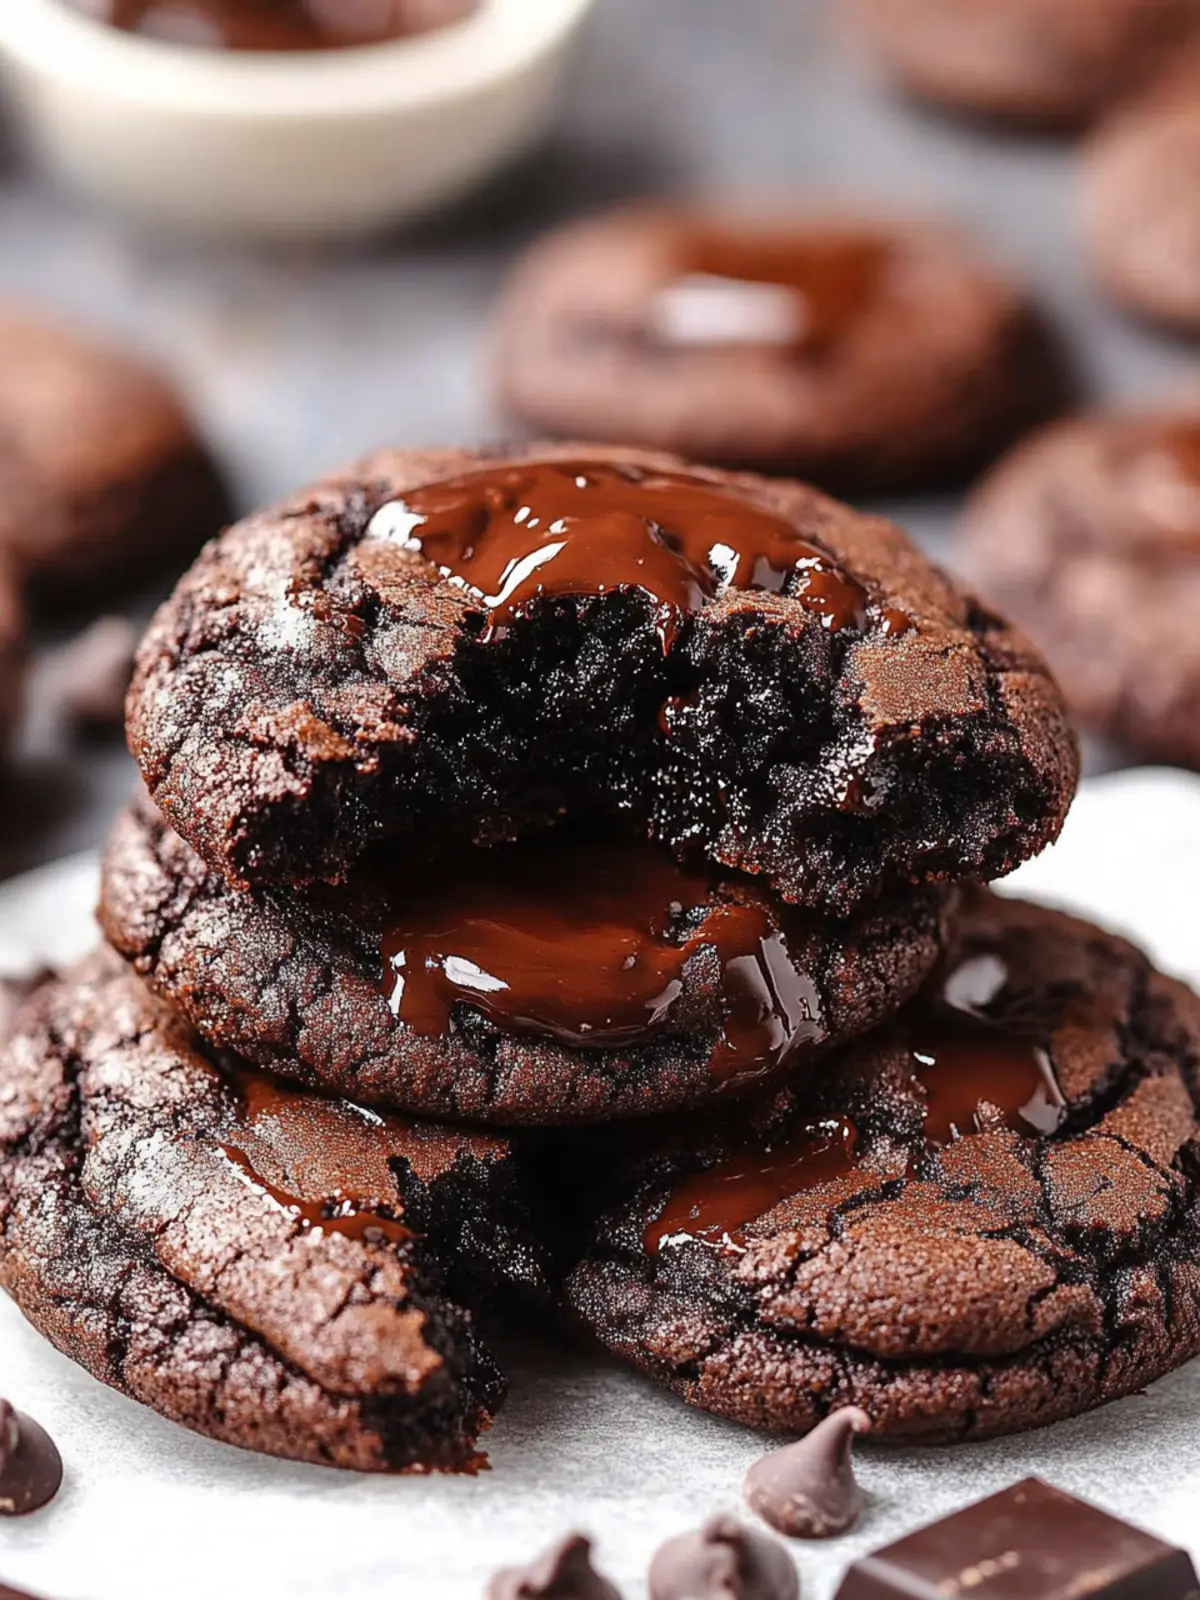
“You’ve got to try these,” my friend insisted over text, sending a blurry picture of molten chocolate oozing out of a cookie. Honestly, I was skeptical—cookies with lava centers? It sounded like some fancy pastry shop magic, not a simple home bake. But after a long, dragging day that left me craving something rich and comforting, I decided to give it a shot. The first bite was like a little warm hug melting into pure bliss. The cookie’s crisp edges gave way to a molten chocolate center that tasted so indulgent, yet surprisingly easy to make. It became a quick obsession—I found myself making these decadent chocolate lava cookies multiple times in a week, tweaking the chocolate intensity just a bit each time.
What really stuck with me, aside from the delicious mess they made, was how this recipe turned a tired evening into a cozy, quiet moment of joy. There’s something about that ooey-gooey chocolate surprise that feels like a secret treat you deserve, even on the busiest days. It’s not just about the chocolate; it’s the textures, the warmth, the way the house smells like a chocolate dream in progress. After making these cookies, I ended up sharing them with friends, who couldn’t believe such indulgence came from a humble kitchen effort.
So, if you’re up for a homemade treat that’s truly worth the little extra attention—whether for a quiet night in or a sweet finish to a gathering—these decadent chocolate lava cookies hold that perfect balance of ease and wow. It’s a recipe that, once you try, you’ll find yourself coming back to, just like I did.
Why You’ll Love This Recipe
From my many trials baking these decadent chocolate lava cookies, I can tell you they’re not your everyday chocolate chip cookies. These are special in every sense, and here’s why they quickly earned a permanent spot in my recipe box:
- Quick & Easy: They take under 30 minutes from start to finish—great for last-minute cravings or a weekend bake session.
- Simple Ingredients: No need to hunt for obscure items; everything’s likely in your pantry or local store.
- Perfect for Any Occasion: Whether it’s an intimate dessert, a party treat, or even a charming gift, these cookies hit the spot.
- Crowd-Pleaser: Friends and family all rave about the gooey center that contrasts so well with the slightly crisp cookie exterior.
- Unbelievably Delicious: The texture combo of a soft cookie shell paired with molten chocolate is honestly next-level comfort food.
What sets this recipe apart? I found that chilling the dough just right, then baking at a precise temperature creates that perfect lava flow without collapsing the cookie. Using high-quality bittersweet chocolate chunks makes a huge flavor difference too—trust me, it’s worth the splurge. This isn’t just a cookie; it’s a little homemade luxury that makes you pause and savor.
It’s the kind of dessert where you close your eyes after the first bite, feeling that warm, chocolatey melt. If you love the idea of soft chocolate chip cookies but want to take it to the next level, this recipe delivers that intimate, indulgent experience without a ton of fuss.
What Ingredients You Will Need
This recipe uses straightforward, wholesome ingredients to create that rich chocolate lava effect and a perfectly tender cookie shell. Most are pantry staples, and you can swap a few items to suit your preferences or dietary needs.
- Unsalted butter, softened (adds richness and helps the cookie base)
- Granulated sugar (for sweetness and crisp edges)
- Brown sugar, packed (for moisture and a hint of caramel flavor)
- Large eggs, room temperature (binds the dough and adds tenderness)
- Vanilla extract (pure, if possible, for deep flavor)
- All-purpose flour (the base of the cookie dough)
- Unsweetened cocoa powder (for chocolate richness and color)
- Baking powder (helps the cookies rise just enough)
- Salt (balances flavor)
- Bittersweet chocolate chunks or chips (use a good brand like Ghirardelli or Valrhona for best melty centers)
- Optional: espresso powder (a pinch enhances the chocolate’s depth without tasting like coffee)
If you want a gluten-free version, swapping all-purpose flour for a 1:1 gluten-free blend works well, but watch the baking time carefully. For dairy-free, substitute the butter with coconut oil or a plant-based butter alternative, and use dairy-free chocolate chunks. I’ve tried switching in almond flour once, but it gave a nuttier taste and a denser texture, which was interesting but not quite the lava effect I was after.
Equipment Needed
- Mixing bowls: A medium and a large bowl for wet and dry ingredients
- Electric mixer or hand whisk: Helps cream butter and sugar quickly
- Measuring cups and spoons: For precise ingredient amounts
- Baking sheet: A rimmed cookie sheet works best to catch any chocolate drips
- Parchment paper or silicone baking mat: Prevent sticking and ease cleanup
- Cookie scoop or spoon: For forming uniform dough balls
- Cooling rack: To let cookies rest without getting soggy
I usually use a silicone baking mat because it heats evenly and makes lifting the cookies off easier. If you don’t have one, parchment paper is a great budget-friendly alternative. Also, a good cookie scoop makes the portioning quicker and ensures consistent lava centers. Trust me, uneven dough sizes can cause some cookies to overbake or underbake, messing with the lava effect.
Preparation Method
- Preheat your oven to 350°F (175°C) and line your baking sheet with parchment or a silicone mat. This step sets the stage for perfectly baked cookies.
- Cream the butter and sugars: In a large bowl, beat 1 cup (227g) softened unsalted butter with 3/4 cup (150g) granulated sugar and 3/4 cup (165g) packed brown sugar until the mixture is light and fluffy, around 3-4 minutes. The texture should look pale and airy, which helps create tender cookies.
- Add eggs and vanilla: Beat in 2 large eggs, one at a time, then stir in 2 teaspoons vanilla extract. Mix until combined but don’t overdo it or the dough might get tough.
- Combine dry ingredients: In a separate bowl, sift together 2 cups (250g) all-purpose flour, 1/2 cup (50g) unsweetened cocoa powder, 1 teaspoon baking powder, 1/2 teaspoon salt, and optional 1/2 teaspoon espresso powder. Make sure everything is well mixed for even flavor distribution.
- Mix dry into wet: Gradually add the dry ingredients into the wet batter. Use a spatula or low mixer speed just until the flour disappears. The dough will be thick, almost fudge-like. Overmixing can make cookies dense, so careful here.
- Fold in chocolate chunks: Gently fold in 1 1/2 cups (270g) bittersweet chocolate chunks. The chunks provide pockets of molten chocolate and texture contrast.
- Chill the dough: Cover the dough and refrigerate for at least 30 minutes to 1 hour. This step is crucial—it firms up the dough so the cookies bake with crisp edges and a molten center, rather than spreading flat.
- Form dough balls: Using a cookie scoop or tablespoon, scoop dough into 1 1/2-inch (about 3.5 cm) balls and place them 2 inches apart on the prepared baking sheet. You want them uniform so they bake evenly.
- Bake: Bake in the preheated oven for 9 to 11 minutes. Cookies should look set on the edges but still soft and slightly underbaked in the center. The centers will finish setting as they cool—don’t overbake or you’ll lose that lava flow.
- Cool slightly and enjoy: Let cookies cool on the baking sheet for 5 minutes before transferring to a wire rack. This rest allows the chocolate centers to settle without losing their gooey texture.
If you want a quicker treat, these cookies pair beautifully with a scoop of vanilla ice cream or a drizzle of caramel sauce. And if you’re curious about balancing chocolate with savory, I once paired a batch with a creamy curry mayo dip from my easy homemade curry mayo recipe—odd combo, but surprisingly delightful!
Cooking Tips & Techniques
Getting the perfect lava cookie is a bit of a sweet science, but once you get the hang of it, it’s pretty straightforward.
- Chill the dough: This is non-negotiable. Warm dough spreads too much, and you lose that molten center. I learned that the hard way after a few flat cookies.
- Use quality chocolate: Cheap chocolate chips don’t melt as smoothly. Bittersweet or dark chocolate chunks with higher cocoa content give you that rich, gooey core.
- Watch the baking time: Oven temperatures vary, so start checking at 9 minutes. The cookies should be firm on the edges but slightly soft in the middle—if they look fully set, the lava effect might be gone.
- Don’t skip the cooling time: Letting cookies rest on the baking sheet lets the lava center set just enough to avoid messy drips.
- Experiment with dough size: Bigger dough balls mean longer bake times and thicker centers, but too big and the cookie might stay doughy. I found 1.5-inch balls hit the sweet spot.
One time, I tried folding in chopped toasted nuts for crunch, but they interfered with the lava flow, so I keep those separate now. Also, if you’re short on time, you can shape and freeze dough balls, then bake directly from frozen—just add an extra minute or two to the bake.
Variations & Adaptations
While the classic chocolate lava cookie is heavenly on its own, it’s fun to mix things up based on season, dietary needs, or flavor cravings.
- Mint Chocolate Lava Cookies: Add 1/2 teaspoon peppermint extract and swap some chocolate chunks for mint chocolate chips. It’s refreshing and perfect for holiday seasons.
- Peanut Butter Swirl: Drop small dollops of peanut butter into the dough balls before baking for a salty-sweet twist.
- Gluten-Free Version: Use a gluten-free baking blend in place of all-purpose flour. I recommend Bob’s Red Mill 1-to-1 for best results.
- Vegan Adaptation: Replace butter with vegan margarine, eggs with flax eggs (1 tbsp ground flax + 3 tbsp water per egg), and use dairy-free chocolate chunks.
- Spiced Chocolate: Mix in 1/2 teaspoon cinnamon and a pinch of cayenne pepper for a warm, spicy kick.
I personally love the mint version around Christmas, but when I want a simpler, cozy vibe, sticking to the classic recipe is unbeatable. For a richer experience, try pairing these cookies with a cup of rich homemade ramen broth—yes, it sounds strange, but the contrast of savory and sweet is oddly satisfying!
Serving & Storage Suggestions
These decadent chocolate lava cookies are best served warm to really enjoy that molten center. If you’re serving a crowd, bake them shortly before guests arrive and keep them on the baking sheet covered with foil to retain warmth.
For a fancy touch, dust with powdered sugar or serve alongside fresh berries and a scoop of vanilla or coffee ice cream. A drizzle of caramel or raspberry sauce also complements the chocolate beautifully.
Store leftover cookies in an airtight container at room temperature for up to 2 days. If you want to keep them longer, freeze the baked cookies in a single layer on a baking sheet, then transfer to a freezer-safe bag for up to 3 months.
To reheat, pop them in a 300°F (150°C) oven for about 5-7 minutes or microwave for 15-20 seconds—just enough to warm the lava center without drying out the edges. Over time, the flavors deepen, so reheated cookies can be even more decadent.
Nutritional Information & Benefits
These chocolate lava cookies aren’t exactly health food, but they do contain some redeeming qualities. Each cookie roughly contains around 250–300 calories, with about 15 grams of fat and 30 grams of carbohydrates, depending on size and ingredients.
The cocoa powder is packed with antioxidants and may boost mood, while dark chocolate chunks provide iron and magnesium. Using high-quality ingredients means fewer additives and more natural flavors.
For those watching allergens, the recipe contains gluten, dairy, and eggs. Substitutions for gluten-free or vegan versions can be made, but be mindful that texture and flavor might vary slightly.
Overall, these cookies serve as a well-deserved treat that satisfies chocolate cravings with a home-baked touch—like a little moment of indulgence with a side of love.
Conclusion
To wrap up, these decadent chocolate lava cookies are the kind of treat that makes you linger a bit longer over dessert. They’re easy enough for a weekday splurge but special enough to impress guests or mark a cozy celebration. The combination of crisp edges and molten chocolate centers is a simple pleasure that never gets old.
Feel free to tweak the chocolate type, add your favorite mix-ins, or try the variations to make this recipe your own. I keep coming back to this one because it turns ordinary ingredients into a little chocolate masterpiece every time.
Now it’s your turn to experience that warm chocolate rush. If you try making these, I’d love to hear how you personalized them or what your favorite pairing is—drop a comment below and share your lava cookie stories!
FAQs About Decadent Chocolate Lava Cookies
How do I get the perfect molten center every time?
Chilling the dough before baking and watching your baking time carefully are key. Bake just until the edges are set but the center still looks soft. Cooling on the baking sheet before transferring helps the center firm without losing the lava effect.
Can I use chocolate chips instead of chunks?
Yes, but chunks tend to melt better and create larger pockets of molten chocolate. Chips sometimes hold their shape more, so for the best lava effect, chunks are preferred.
How should I store leftover cookies?
Keep them in an airtight container at room temperature for a couple of days or freeze for longer storage. Reheat gently in the oven or microwave to revive the molten center.
Can I make the dough ahead of time?
Absolutely! The dough can be refrigerated for up to 2 days or frozen for up to 3 months. Baking from chilled or frozen dough works well, just adjust baking time slightly.
What’s the best way to serve these cookies?
Serve warm, alone or with vanilla ice cream, fresh berries, or a dusting of powdered sugar. A drizzle of caramel or raspberry sauce adds a lovely touch.
Pin This Recipe!
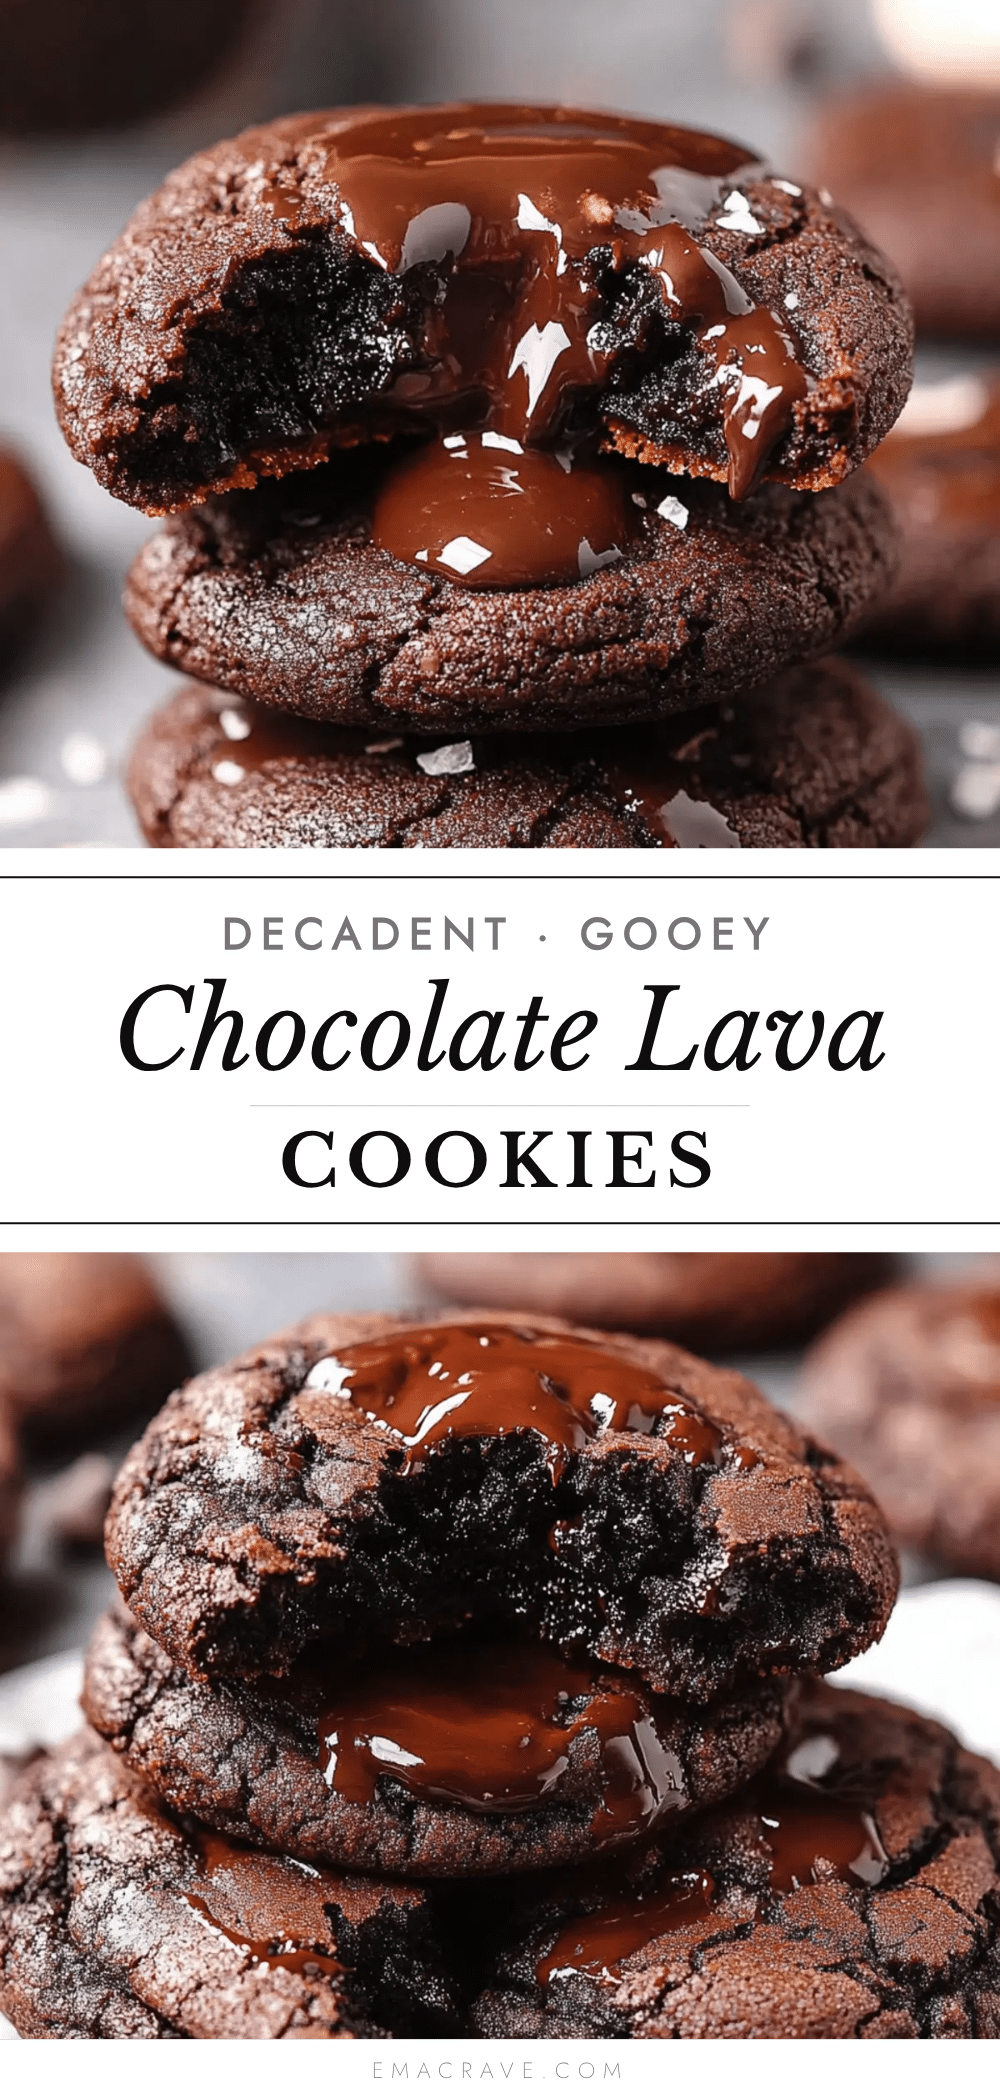
Decadent Chocolate Lava Cookies

These decadent chocolate lava cookies feature crisp edges with a molten chocolate center, offering a rich and indulgent homemade treat that’s quick and easy to make.
- Prep Time: 15 minutes
- Cook Time: 10 minutes
- Total Time: 25 minutes
- Yield: 24 cookies 1x
- Category: Dessert
- Cuisine: American
Ingredients
- 1 cup (227g) unsalted butter, softened
- 3/4 cup (150g) granulated sugar
- 3/4 cup (165g) packed brown sugar
- 2 large eggs, room temperature
- 2 teaspoons vanilla extract
- 2 cups (250g) all-purpose flour
- 1/2 cup (50g) unsweetened cocoa powder
- 1 teaspoon baking powder
- 1/2 teaspoon salt
- Optional: 1/2 teaspoon espresso powder
- 1 1/2 cups (270g) bittersweet chocolate chunks or chips
Instructions
- Preheat your oven to 350°F (175°C) and line your baking sheet with parchment paper or a silicone baking mat.
- In a large bowl, beat 1 cup softened unsalted butter with 3/4 cup granulated sugar and 3/4 cup packed brown sugar until light and fluffy, about 3-4 minutes.
- Beat in 2 large eggs, one at a time, then stir in 2 teaspoons vanilla extract until combined.
- In a separate bowl, sift together 2 cups all-purpose flour, 1/2 cup unsweetened cocoa powder, 1 teaspoon baking powder, 1/2 teaspoon salt, and optional 1/2 teaspoon espresso powder.
- Gradually add the dry ingredients into the wet batter, mixing just until combined and the flour disappears.
- Gently fold in 1 1/2 cups bittersweet chocolate chunks.
- Cover the dough and refrigerate for at least 30 minutes to 1 hour to firm up.
- Using a cookie scoop or tablespoon, form dough into 1 1/2-inch balls and place them 2 inches apart on the prepared baking sheet.
- Bake for 9 to 11 minutes until edges are set but centers are still soft and slightly underbaked.
- Let cookies cool on the baking sheet for 5 minutes before transferring to a wire rack to cool completely.
Notes
Chilling the dough is crucial to achieve the molten center without spreading. Use high-quality bittersweet chocolate chunks for best melting and flavor. Watch baking time carefully to avoid overbaking. Dough can be frozen for up to 3 months; add 1-2 minutes to baking time if baking from frozen.
Nutrition
- Serving Size: 1 cookie
- Calories: 275
- Sugar: 18
- Sodium: 150
- Fat: 15
- Saturated Fat: 9
- Carbohydrates: 30
- Fiber: 3
- Protein: 4
Keywords: chocolate lava cookies, molten chocolate cookies, easy chocolate cookies, homemade chocolate treats, decadent cookies